Sharp MX-C300W Driver Download and Wireless Setup – The Sharp MX-C300W is a compact, multifunctional printer designed for small businesses and home offices. It is an all-in-one machine that can print, scan, copy, and fax. The MX-C300W has a sleek design and offers excellent print quality, making it an attractive option for businesses that value high-quality prints.
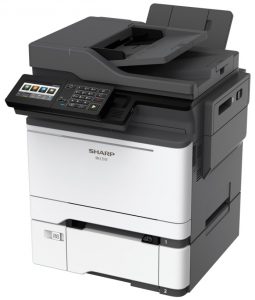
Sharp MX-C300W
Key Features:
The Sharp MX-C300W offers a range of features that make it a great choice for small businesses and home offices. One of the most notable features of the MX-C300W is its wireless connectivity. It can connect to a wireless network or be used with a wired Ethernet connection. Additionally, it supports AirPrint, Google Cloud Print, and Mopria, making it easy to print from a variety of devices, including smartphones and tablets.
The MX-C300W has a print speed of up to 30 pages per minute and a first-page-out time of 11 seconds. It offers automatic two-sided printing and has a 250-sheet paper tray that can handle paper sizes up to 8.5 x 14 inches. It also has a 50-sheet bypass tray for envelopes and other special media.
Design and Build Quality:
The MX-C300W has a sleek, modern design with a small footprint that makes it easy to fit into any office space. It has a color LCD touchscreen display that is easy to navigate and allows users to access a range of features and settings. The machine has a sturdy build quality and feels durable and reliable.
Setup and Connectivity:
Setting up the MX-C300W is straightforward, and the machine comes with a quick-start guide to help users get started. The printer can be set up via USB or Ethernet, and it also supports wireless connectivity. The MX-C300W has a range of connectivity options, including AirPrint, Google Cloud Print, and Mopria, making it easy to print from a variety of devices.
Performance:
The MX-C300W offers excellent performance, with a print speed of up to 30 pages per minute and a first-page-out time of 11 seconds. It has a range of features that make it easy to use, including automatic two-sided printing and a color LCD touchscreen display. The machine is also very quiet during operation, making it suitable for use in small offices or shared workspaces.
Print Quality:
The Sharp MX-C300W offers excellent print quality, with crisp, clear text and vibrant colors. It uses a four-color printing system and has a print resolution of up to 600 x 600 dpi. The machine also has a range of color settings and features that allow users to adjust the color balance, saturation, and brightness of their prints.
Scanning and Copying:
The MX-C300W offers both scanning and copying capabilities, making it a versatile machine for small businesses and home offices. It has a flatbed scanner that can scan documents up to 8.5 x 11.7 inches, and it also has a 50-sheet automatic document feeder for scanning or copying multiple pages at once. The machine can scan at a resolution of up to 600 x 600 dpi and can copy up to 99 pages at once.
Paper Handling and Capacity:
The Sharp MX-C300W has a paper capacity of up to 250 sheets and can handle paper sizes up to 8.5 x 14 inches. It also has a 50-sheet bypass tray for envelopes and other special media. The machine offers automatic two-sided printing, which helps to save on paper costs and reduces environmental impact.
Recommended Printer: Sharp MX-C400P Driver and Review
Sharp MX-C300W Wireless Setup
Step 1: Check Your Network
Before setting up the Sharp MX-C300W wirelessly, make sure that your wireless network is active and running. You will need the name of your wireless network and its password to complete the setup process.
Step 2: Power Up the Printer
Turn on the Sharp MX-C300W and wait for it to finish warming up.
Step 3: Connect to Wi-Fi
Press the “Menu” button on the printer’s control panel and use the arrow keys to navigate to the “Network” option. Press “OK” to enter the Network menu, and then select “Wireless LAN” from the options. Choose “Setup” and then select “Wireless LAN Setup” to begin the wireless setup process.
Step 4: Enter Network Information
The printer will scan for available wireless networks. Select your network from the list and enter your password when prompted. Once you have entered the correct network information, press “OK” to save the settings.
Step 5: Verify the Connection
After the Sharp MX-C300W has connected to your wireless network, it will display a message confirming the connection. You can verify the connection by printing a network status report from the printer’s control panel.
Step 6: Install Printer Software
To use the Sharp MX-C300W wirelessly, you will need to install the printer software on your computer. You can download the software or use the installation CD that came with the printer.
Step 7: Add Printer to Your Network
Once you have installed the printer software, you will need to add the Sharp MX-C300W to your list of available printers. You can do this by going to the Control Panel on your computer and selecting “Devices and Printers.” Click “Add a Printer” and follow the prompts to add the Sharp MX-C300W to your network.
With these simple steps, you can set up the Sharp MX-C300W wirelessly and enjoy the benefits of a wireless network in your office.
How to Install Sharp MX-C300W Driver For Windows
- Click the Printer Driver button.
- Click the Standard installation button.
- Printers connected to the network are detected. Select the machine & click the Next button.
- A confirmation window appears. Check the contents & then click the Next button.
- Follow the on-screen instructions.
[Note]
- If you are using Windows Vista, Server 2008, 7, 8, and Server 2012, be sure to click Install this driver software anyway.
- If you are using Windows XP, Server 2003, be sure to click the Continue Anyway or Yes button.
- When the installation completed screen appears, click the OK button.
- Click the Close button in the window
How to Install Sharp MX-C300W Driver For Mac OS
- Insert the “Software CD-ROM” into your computer’s CD-ROM drive.
- Double-click the CD-ROM icon on the desktop.
- Double-click the MacOSX folder
- Then, Double-click the folder corresponding to the versions of the operating system.
- Double-click the MX-C42 icon
- Click the Continue button.
- The License Agreement window will appear. Make sure that you understand the contents of the license agreement and then click the Continue button.
- Click the [Install] button.
- When the installation completed screen appears, click the Close button.
- Click System Preference in the Apple menu and select Print & Scan.
- Click the + button and select “XXXX”.
- Configure the printer driver.
- Click the Option & Supplies button & click the Driver tab.
- Then, Click the Default icon.
- Click the machine’s model name.
- Choose the PPD file of your model.
- Click the Add button.
- Select the machine configuration.
- Choose the options that are installed on the machine.
- Click the OK button.
- Click to close the window.
Supported Operating System
- Windows 11, 10, 8, 8.1, 7. Windows Server 2022, 2019, 2016, 2012 R2/2012, 2008
- macOS 12, macOS 11, macOS 10.15, macOS 10.14, macOS 10.13, macOS 10.12, OS X 10.11, OS X 10.10, OS X 10.11, OS X 10.10
Sharp MX-C300W Driver & Downloads
[ Download ] ↔ Sharp MX-C300W Driver Windows 64-bit
[ Download ] ↔ Sharp MX-C300W Driver Windows 32-bit
[ Download ] ↔ Sharp MX-C300W Scanner Driver Windows
[ Download ] ↔ Sharp MX-C300W Driver Mac
Sharp MX-C300W Printer Driver Download ↔ Sharp Official Site